
English version
In the new version of the Manager API (QA and PDN environment), the authentication method using tokens has been updated.
Previously, the authorization token (Bearer Token) had to be manually inserted into the header of each endpoint when testing or consuming the API from Swagger.
With this update, a new centralized authentication option has been enabled in Swagger, allowing the token to be entered only once. This token will then be automatically applied to all endpoints.
🔧 Details of the change
|
Field |
Value |
|---|---|
|
Affected Environment |
QA and PDN |
|
Component |
API Authentication |
|
API |
Manager API (v1) |
|
Swagger URL and API documentation QA |
|
|
Swagger URL and API documentation PDN |
|
|
Authentication type |
Bearer (apiKey) |
🔄 New behavior
-
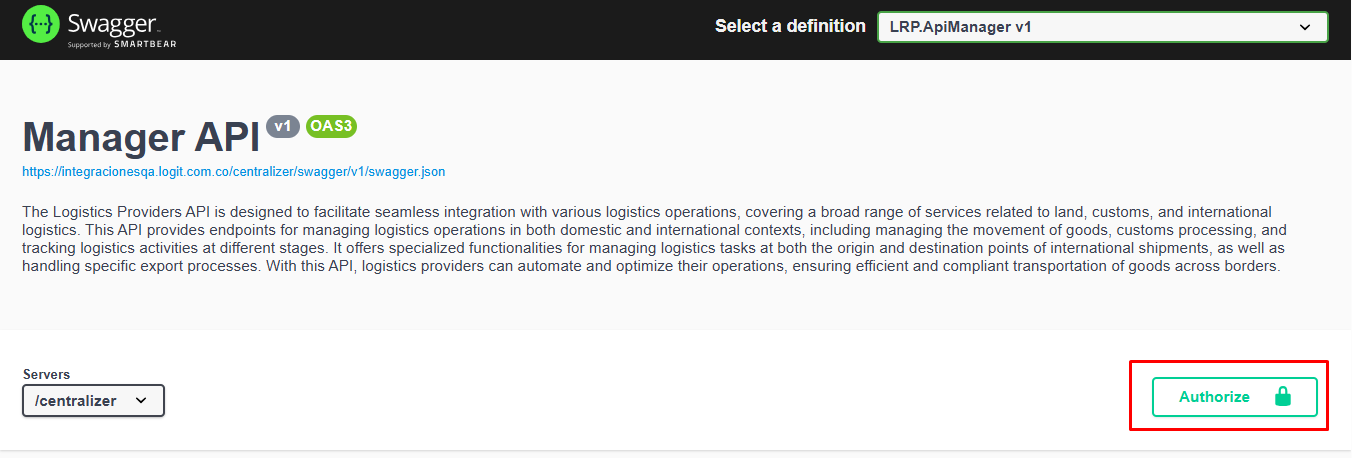
In the upper-right corner of Swagger, you will find the “Authorize” 🔒 button.
-
Clicking it opens a window to enter the Bearer token.
-
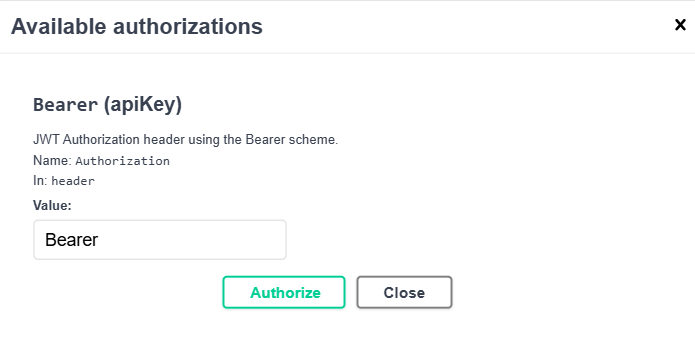
You must enter the full token in the Value field (e.g.,
Bearer eyJhbGciOiJIUzI1NiIsInR5cCI6...). -
Once authorized, Swagger will automatically apply the token to all endpoints, eliminating the need to add it manually for each request.
✅ Benefits
-
Simplifies the authentication process in Swagger.
-
Prevents errors when copying or pasting the token into each endpoint.
-
Increases efficiency and consistency during the process.
⚠️ Important note
-
The rest of the API consumption process remains unchanged.
-
This update does not affect existing configurations in Postman, custom applications, or other integration tools.
-
It only changes how the token is entered within the Swagger environment.
🛠️ Required action
Users must now enter the token using the “Authorize” option before executing any endpoint in Swagger.
Spanish version
En la nueva versión de la Manager API (entorno QA y PDN), se ha actualizado la forma en que se realiza la autenticación mediante token.
Anteriormente, el token de autorización (Bearer Token) debía insertarse manualmente en el header de cada endpoint al realizar las pruebas o consumir la API desde Swagger.
Con esta actualización, se habilitó una nueva opción de autenticación centralizada en Swagger, lo que permite ingresar el token una sola vez y que este se aplique automáticamente a todos los endpoints.
🔧 Detalles del cambio:
|
Field |
Value |
|---|---|
|
Entorno affectado |
QA y PDN |
|
Componente |
API Authentication |
|
API |
Manager API (v1) |
|
Swagger URL y documentación API - QA |
|
|
Swagger URL y documentación API - PDN |
|
|
Tipo de autenticación |
Bearer (apiKey) |
🔄 Nuevo comportamiento
-
En la parte superior derecha de Swagger, se encuentra el botón “Authorize” 🔒.
-
Al hacer clic, se despliega una ventana para ingresar el token Bearer:
-
Se debe ingresar el token completo en el campo Value (por ejemplo:
Bearer eyJhbGciOiJIUzI1NiIsInR5cCI6...). -
Una vez autorizado, Swagger aplicará automáticamente el token a todos los endpoints, evitando la necesidad de repetirlo manualmente en cada solicitud.
✅ Beneficios
-
Simplifica el proceso de autenticación en Swagger.
-
Evita errores al copiar o pegar el token en cada endpoint.
-
Aumenta la eficiencia y la consistencia en las pruebas
⚠️ Nota importante
-
El resto del proceso de consumo de la API permanece igual.
-
Este cambio no afecta las configuraciones existentes que los clientes ya tengan en Postman, aplicaciones propias o otras herramientas de integración.
-
Únicamente aplica para la forma en que se ingresa el token dentro del entorno Swagger.
🛠️ Acción requerida
Los usuarios deberán ahora ingresar el token únicamente mediante la opción “Authorize” antes de ejecutar cualquier endpoint.